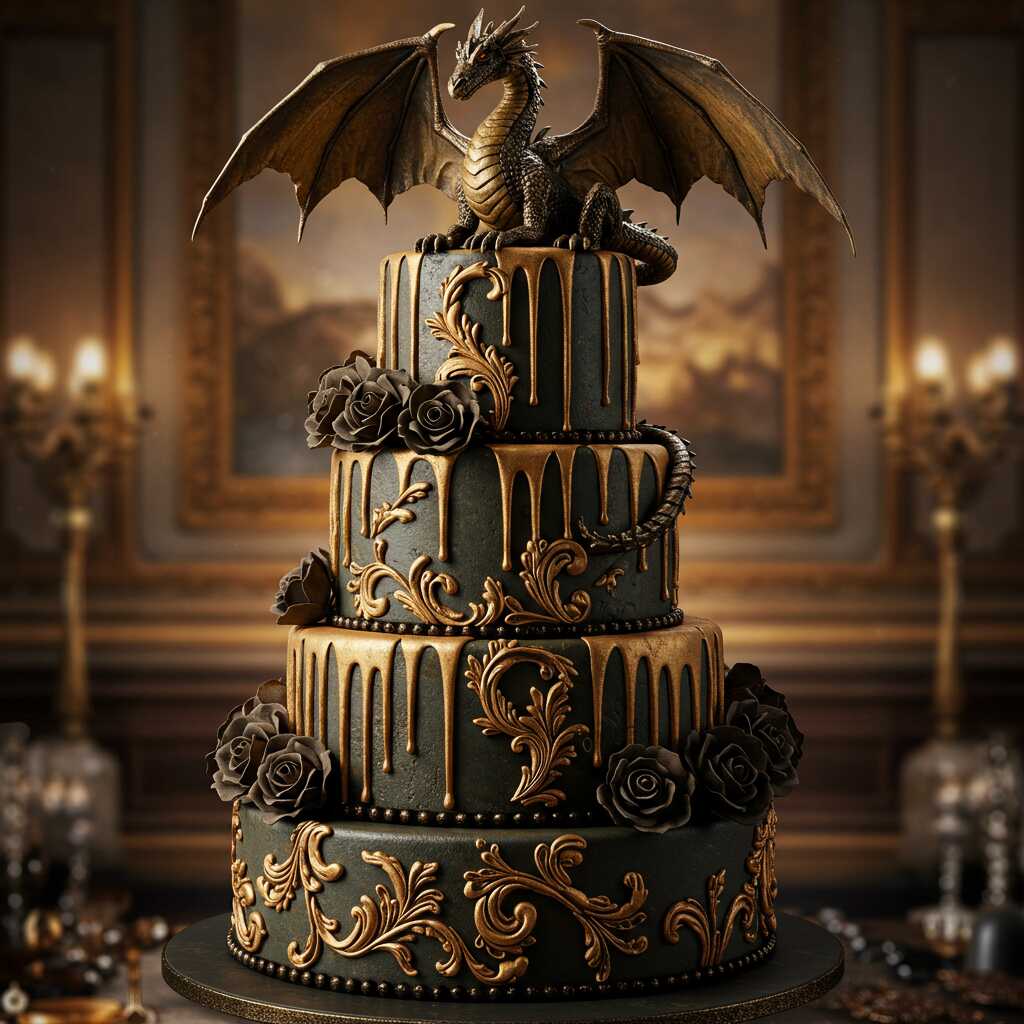
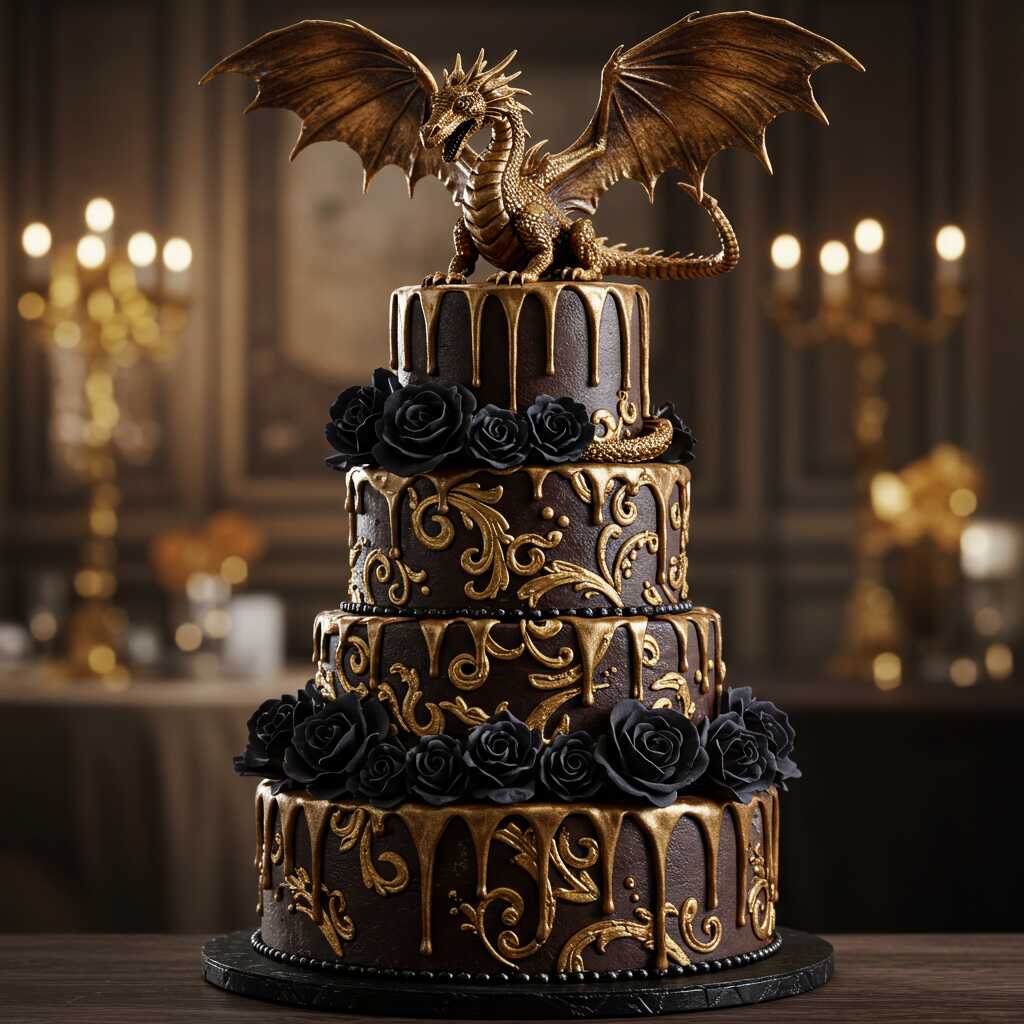
The allure of a dragon-themed cake is undeniable. Whether you’re celebrating a birthday, hosting a fantasy-themed party, or simply indulging in your love for mythical creatures, crafting a dragon-themed cake at home can be a thrilling and rewarding experience. Dragons have long captivated our imaginations with their majestic presence, fiery breath, and untamed spirit. Translating that magic into a dessert masterpiece not only showcases your creativity but also brings an element of wonder to any occasion.
Creating a dragon themed cake might seem daunting at first, especially if you’re new to cake decorating. However, with the right tools, techniques, and mindset, you can transform simple ingredients into a roaring work of edible art. This ultimate guide will walk you through every step of the process, from planning your design to adding those final intricate details. By the end, you’ll have all the knowledge and confidence needed to craft an epic dragon-themed cake that will leave everyone in awe.
This journey isn’t just about baking—it’s about storytelling. Each layer, each color, and each detail contributes to the narrative of your dragon. Whether it’s a fierce guardian perched atop a treasure chest or a whimsical creature soaring through a sugary sky, your cake has the potential to become a centerpiece that sparks joy and imagination. So, roll up your sleeves, gather your ingredients, and let’s dive into the enchanting world of dragon-themed cakes!

Contents
Part 1: Planning Your Dragon-Themed Cake Masterpiece
Designing Your Vision: Where Imagination Meets Reality
Before you even preheat the oven, take some time to envision what kind of dragon-themed cake you want to create. Start by sketching your ideas on paper or digitally if you prefer. Will your dragon be realistic and fierce, or playful and cartoonish? Consider the overall theme—will it feature a medieval castle backdrop, a mystical forest setting, or perhaps a fiery volcano scene?
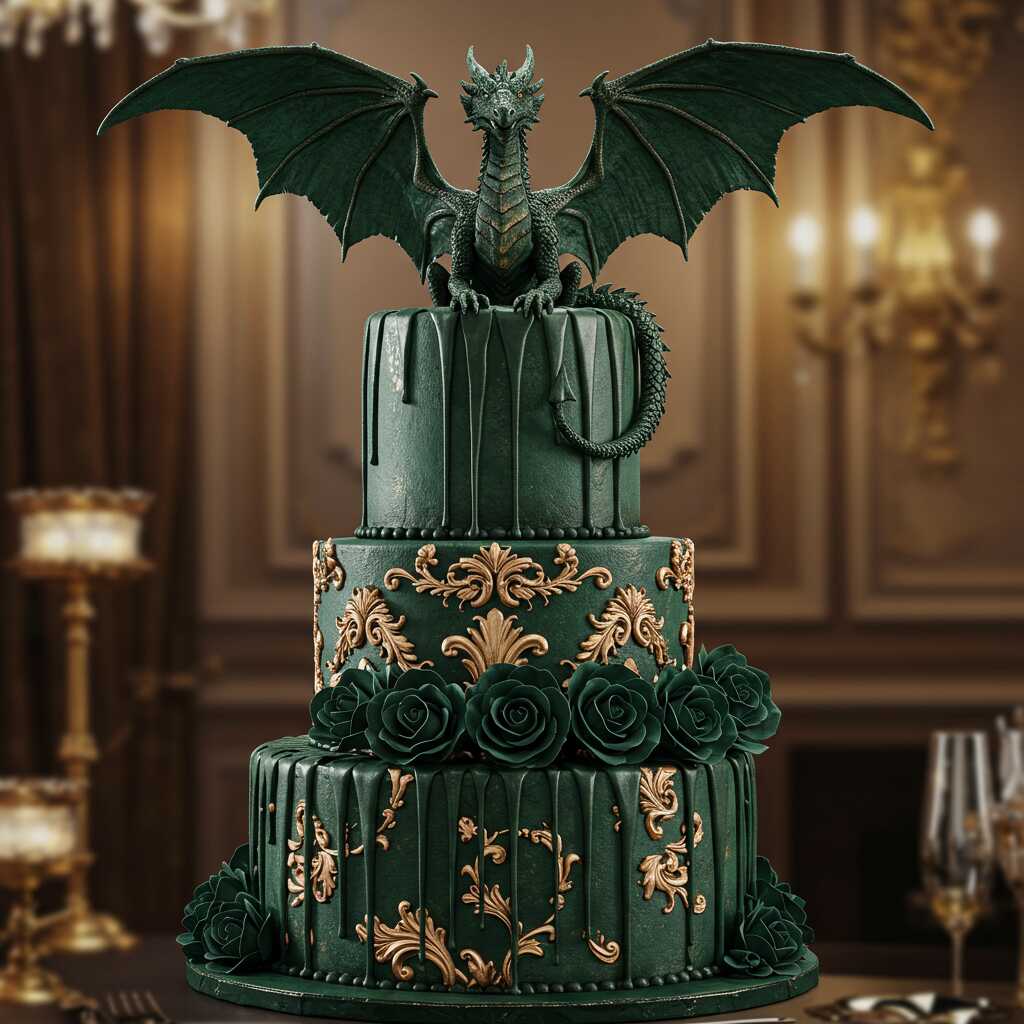
Think about the colors you’d like to incorporate. Traditional dragon hues often include shades of green, red, gold, and black, but don’t feel limited by convention. Pastel dragons, icy blue frost dragons, or even rainbow-colored ones are equally valid choices. Choosing a cohesive color palette early on will help guide your decisions throughout the project.
Selecting the Right Cake Base
The foundation of any great dragon-themed cake is the cake itself. Opt for flavors that complement the visual theme while satisfying taste buds. Classic options like chocolate or vanilla provide a neutral base that pairs well with vibrant decorations, while more adventurous flavors like red velvet or lemon could add an extra layer of excitement.
Consider the size and shape of your cake layers. For a towering dragon silhouette, stacked round cakes work beautifully. If you envision a sprawling landscape with multiple elements, sheet cakes offer more surface area for creativity. Don’t forget to account for structural stability when designing multi-tiered cakes; using dowels or supports ensures your creation doesn’t collapse under its own weight.
Gathering Essential Tools and Ingredients
To bring your dragon-themed cake to life, you’ll need a few key tools beyond standard baking supplies. Fondant—a smooth, pliable icing—is indispensable for sculpting detailed features like scales, wings, and claws. Gumpaste is another versatile material ideal for creating delicate accents such as horns or spikes. Invest in quality rolling pins, cutters, and modeling tools to achieve professional-looking results.
Food coloring plays a crucial role in achieving vivid hues. Gel-based colors are preferred over liquid varieties because they produce richer tones without altering the consistency of your frosting or fondant. Edible glitter, metallic dusts, and airbrush kits can elevate your cake with shimmering effects reminiscent of dragon scales catching sunlight.
Lastly, consider incorporating non-edible decorative items sparingly, such as figurines or LED lights, to enhance the overall presentation. Just ensure these additions are securely attached and clearly marked if they aren’t meant to be consumed.

Part 2: Bringing Your Dragon-Themed Cake to Life
Sculpting the Dragon: From Dough to Dazzling Creature
Once your cake layers are baked and assembled, it’s time to focus on the star of the show—the dragon itself. Begin by covering your cake with a thin layer of buttercream or ganache to seal in crumbs and create a smooth canvas for fondant application. Chill the cake briefly to set this crumb coat before proceeding.
Using fondant, start shaping the dragon’s body. Roll out large pieces for the torso and smaller sections for limbs, tail, and head. Pinch and mold these components together, smoothing seams with your fingers or a small tool dipped in cornstarch to prevent sticking. Pay close attention to proportions; a balanced design enhances realism and visual appeal.
For intricate details like scales, use textured mats or handmade stamps pressed gently into the fondant. Alternatively, carve individual scales with a sharp knife or needle tool for a more customized look. Add depth and dimension by layering different shades of fondant or painting directly onto the surface with edible paints.
Creating Dynamic Features: Eyes, Wings, and More
A dragon’s eyes are windows to its soul—or at least the focal point of your cake. Use gumpaste to craft lifelike eyeballs, layering whites, irises, and pupils for maximum impact. Highlight them with edible gloss or varnish to make them pop against the surrounding textures.
Wings present another opportunity to showcase your artistic flair. Cut wing shapes from thinly rolled fondant or gumpaste, then emboss veins and patterns using specialized tools or freehand techniques. Attach wings securely to the dragon’s back using royal icing or melted chocolate as adhesive. For added drama, position one wing slightly forward to suggest movement or action.
Claws, horns, and spikes complete the dragon’s formidable appearance. Form these parts from gumpaste, allowing them to dry thoroughly before attaching. Vary their sizes and angles to mimic natural irregularities found in real animals. A light dusting of edible shimmer powder adds a touch of elegance and reinforces the magical theme.
Building the Scene: Setting the Stage for Adventure
No dragon-themed cake is complete without a captivating environment. Surround your dragon with elements that tell a story—perhaps it guards a pile of golden coins fashioned from yellow fondant, or rests amidst jagged rock formations carved from chocolate bark. Incorporate lush foliage made from tinted fondant leaves or piped buttercream vines to evoke a sense of mystery and wonder.
Experiment with gradients and ombre effects to simulate skies, oceans, or fiery landscapes. Airbrushing allows for seamless transitions between colors, while hand-painting offers greater control over specific details. Scatter edible gems or pearls around the base to mimic scattered treasures, reinforcing the fantasy motif.
Lighting can dramatically enhance the ambiance of your dragon-themed cake. Strategically placed LED candles or battery-operated fairy lights cast soft glows that highlight textures and shadows, bringing your creation to life. Be mindful of safety when integrating electrical components, ensuring wires remain hidden and secure.
Part 3: Perfecting the Finishing Touches
Adding Texture and Dimension
Texture is key to making your dragon-themed cake visually engaging. Experiment with various techniques to mimic the roughness of dragon skin, the smoothness of polished gemstones, or the ruggedness of rocky terrain. Drag a fork lightly across fondant surfaces to simulate cracks or grooves, or press lace fabric onto soft icing to imprint intricate patterns.
Layering is another effective method for building depth. Apply successive coats of thinned-down fondant or buttercream to create raised areas or embossed designs. Use stencils to transfer complex motifs like Celtic knots or tribal markings onto flat sections, enhancing the mythical vibe.
For truly eye-catching highlights, employ contrasting colors strategically. Outline scale edges with fine lines of darker shades, or accentuate ridges and contours with metallic accents. These subtle yet impactful touches draw attention to critical areas, guiding viewers’ eyes naturally across the composition.
Troubleshooting Common Challenges
Even experienced bakers encounter obstacles during ambitious projects like dragon-themed cakes. One common issue is sagging fondant due to improper preparation or humidity. To combat this, knead fondant thoroughly beforehand and keep unused portions tightly wrapped until ready to use. Applying a thin layer of shortening or piping gel to the cake surface helps fondant adhere better and reduces slipping.
Air bubbles trapped beneath fondant can ruin an otherwise flawless finish. Prevent this by smoothing the fondant gently with your hands or a smoother tool, working from the center outward to push air toward the edges. If bubbles persist, puncture them carefully with a pin and flatten the area immediately.
Achieving crisp lines and clean cuts requires patience and precision. Keep blades sharp and tools clean to avoid tearing or smudging fondant. Practice cutting small shapes on scraps before attempting larger pieces to build confidence and skill.
Presenting Your Masterpiece with Confidence
Finally, the moment arrives to unveil your dragon-themed cake to the world. Presentation matters almost as much as execution, so choose a display stand or platter that complements your design without overshadowing it. Elevate the cake slightly to give it prominence and allow guests to admire it from all angles.
Consider documenting your hard work with photographs before slicing into the cake. Capture close-ups of intricate details alongside wide shots that showcase the entire arrangement. Share these images proudly on social media or with friends and family who appreciate your culinary artistry.
When serving, encourage guests to marvel at the craftsmanship before diving in. Provide clear instructions on how to remove any non-edible decorations safely. Most importantly, enjoy the fruits of your labor knowing you’ve created something truly extraordinary.
Conclusion: Celebrating Creativity and Magic
Crafting a dragon-themed cake at home is more than just a baking endeavor—it’s an exploration of creativity, patience, and passion. By following this comprehensive guide, you’ve learned how to plan, execute, and perfect every aspect of your dragon-inspired dessert. From designing the initial concept to adding those final shimmering details, each step contributes to a breathtaking result worthy of legend.
Remember, there’s no right or wrong way to interpret a dragon-themed cake. Let your imagination soar freely, experimenting with colors, textures, and themes until you find what resonates most deeply with you. Whether your dragon is fierce and imposing or whimsical and charming, it reflects a piece of your personality and dedication.
As you continue honing your skills, challenge yourself to push boundaries and try new techniques. Perhaps next time, you’ll incorporate moving parts or interactive elements to further engage your audience. Whatever path you choose, know that the joy of creating something magical extends far beyond the kitchen—it inspires wonder and delight in everyone fortunate enough to witness it.
So go forth, unleash your inner pastry artist, and let your dragon-themed cake become a testament to the power of imagination and craftsmanship. After all, in the realm of desserts, dragons reign supreme.